Edit on GitHub
Documentation
File structure
Restapify allow you to easily create REST API routes using a specific file structure. Take the following folder api/ for example:
📂 api
┣ 📂 users
┃ ┗ 📜 _.json
┃ ┗ 📜 [userid].json
┃ ┗ 📜 [userid].DELETE.json
┣ 📂 posts
┃ ┗ 📜 [postid].json
┃ ┗ 📜 my-post.PUT.json
┣ 📜 posts.json
It will serve the following routes:
GET    /users
GET    /users/[userid]
DELETE /users/[userid]
GET    /posts
GET    /posts/[postid]
PUT    /posts/my-post
Route's filename
The mocked API creation start directly with the filename choice.
Simple route
You can create a simple route with the filename of a json file:
📂 api
┣ 📂 animals
┃ ┗ 📜 rabbits.json
┣ 📜 posts.json
It will serve the routes:
GET /animals/rabbits
GET /posts
Underscore notation
To easily manage your different routes json files into folder, you can use the underscore notation:
📂 api
┣ 📂 animals
┃ ┗ 📜 _.json
┃ ┗ 📜 rabbits.json
It will serve the routes:
GET /animals    # <-- served from the file /animals/_.json
GET /animals/rabbits
Route's variables
You can define some variables in your routes by using squared brackets. It works on a filename but also on directory name:
📂 api
┣ 📂 posts
┃ ┗ 📜 [postid].json
┃ ┣ 📂 [postid]
┃ ┃ ┗ 📜 comments.json
This will serve:
GET /posts/[postid]
GET /posts/[postid]/comments
You will be then able to use theses variables in the json files (see the Consume route's variables section).
⚠️ In case your want to use severals variables inside a route like
/posts/[var1]/comments/[var2], make sure that they have an unique name
HTTP's methods
Define your routes method (GET, POST, PUT, DELETE or PATCH) by adding it in the filename separated by a .. The default method is GET:
📂 api
┣ 📂 posts
┃ ┗ 📜 _.GET.json
┃ ┣ 📂 [postid]
┃ ┃ ┗ 📜 _.json
┃ ┃ ┗ 📜 _.POST.json
┃ ┃ ┗ 📜 _.DELETE.json
This will serve:
GET    /posts
GET    /posts/[postid]
POST   /posts/[postid]
DELETE /posts/[postid]
HTTP's status code
Define what status code your route should respond by adding it in the filename after the HTTP method (if there is one) separated by a .. The default status code is 200
📂 api
┣ 📂 posts
┃ ┗ 📜 _.GET.json
┃ ┣ 📂 [postid]
┃ ┃ ┗ 📜 _.200.json
┃ ┃ ┗ 📜 _.POST.201.json
┃ ┃ ┗ 📜 _.DELETE.204.json
It will serve:
GET    /posts           # 200
GET    /posts/[postid]  # 200
POST   /posts/[postid]  # 201
DELETE /posts/[postid]  # 204
Route's state
In an API, the same route may return different responses depending on certain factors. A simple example is a request called with a wrong parameter, the response will probably contain an error message instead of the expected result.
So you can create an endpoint with several different states. To do this you just have to create a new file for each different state by adding at the end of the file the syntax {STATE_NAME} separated by a dot.
Here is an example of how to define an endpoint with several states:
📂 api
┣ 📂 posts
┃ ┗ 📜 _.json
┃ ┣ 📂 [postid]
┃ ┃ ┗ 📜 _.json
┃ ┃ ┗ 📜 _.404.{INV_ID}.json
┃ ┃ ┗ 📜 _.POST.201.json
┃ ┃ ┗ 📜 _.POST.401.{INV_CRED}.json
┃ ┃ ┗ 📜 _.POST.400.{INV_PARAMS}.json
It will serve:
GET    /posts
GET    /posts/[postid]  # 200
POST   /posts/[postid]  # 201
You will then in the dashboard be able to select which state you want to use for a specific route. So for example if you select the state INV_PARAMS for the route POST /posts/[postid], the server will respond with the status code 400.
Route's file content
The structure of the files allows to define the API endpoints, now it is necessary to define what they respond.
Response's body
The content of a route file will correspond to the body of the request's response. For example if the file /api/users/_.json contains this content:
[
  {
    "id": 1,
    "name": "bob"
  },
  {
    "id": 2,
    "name": "alice"
  }
]
The response's body of GET /users will be this array of 2 users.
Extended syntax
A route file can also contain an 'extended' syntax that allow you to specify a custom response's header. The syntax is the following:
{
  "#header": Object,
  "#body": Array or Object
}
Example:
{
  "#header": {
    "Content-Type": "text/html; charset=UTF-8"
  },
  "#body": {
    "success": false
  }
}
No content response
For some endpoints, you don't need to respond anything (for example a request that should response with a 204 No Content). Since an empty file is not a valid JSON file, you need to use the syntax [null] to specify that the response should not return any data:
Example with the file [userid].PUT.204.json:
[null]
Consume route's variables
You can define some route's variables in your route's filename (see route's variables section). You can then consume them in your response's body.
For example the file /api/posts/[postid].json contains the route variable postid that you can use in the file content:
{
  "id": "[postid]",
  "content": "Lorem ipsum dolor sit amet, consectetur adipisici elit, …"
}
As a result, if you request GET /posts/my-post you will get the response:
{
  "id": "my-post",
  "content": "Lorem ipsum dolor sit amet, consectetur adipisici elit, …"
}
Route's variable casting
By default, all route's variables are interpreted as a string.
Number casting
You can cast a variable to a number by using the following syntax "n:[<variable>]". So if you use the previous example and replace the file content to:
{
  "id": "n:[postid]",
  "content": "Lorem ipsum dolor sit amet, consectetur adipisici elit, …"
}
and then call the route GET /posts/42, you will get the response:
{
  "id": 42,
  "content": "Lorem ipsum dolor sit amet, consectetur adipisici elit, …"
}
⚠️ Don't cast your number route's variable that are present in a string. Just use them like
"content": "The post [postid] is nice …"
Boolean casting
You can cast a variable to a boolean by using the following syntax "b:[<variable>]". So if you use the example /api/posts/[postid]/private/[isPrivate].POST.json:
{
  "id": "n:[postid]",
  "private": "b:[isPrivate]",
  "content": "Lorem ipsum dolor sit amet, consectetur adipisici elit, …"
}
and call it from POST /posts/42/private/true, you will get the response:
{
  "id": 42,
  "private": true,
  "content": "Lorem ipsum dolor sit amet, consectetur adipisici elit, …"
}
Consume route's query string variables
You can consume query string variables in your body using the syntax [q:<variable>]
Take the following file /api/users.json for example:
[
  {
    "id": 1,
    "name": "bob",
    "age": "[q:age]"
  },
  {
    "id": 2,
    "name": "alice",
    "age": "[q:age]"
  }
]
I you request GET /api/users?age=42, you will get:
[
  {
    "id": 1,
    "name": "bob",
    "age": "42"
  },
  {
    "id": 2,
    "name": "alice",
    "age": "42"
  }
]
You can also declare a default value using this syntax [q:<variable>|<defaultValue>]:
[
  {
    "id": 1,
    "name": "bob",
    "age": "[q:age|30]"
  },
  {
    "id": 2,
    "name": "alice",
    "age": "[q:age|42]"
  }
]
So if you request GET /api/users you will get:
[
  {
    "id": 1,
    "name": "bob",
    "age": "30"
  },
  {
    "id": 2,
    "name": "alice",
    "age": "42"
  }
]
Fakerjs integration
To easily create mocked data, Restapify integrate the fakerjs library with an easy to use syntax.
To get for example a faked text content with the regular library you will call faker.lorem.paragraphs(). In your route's response you can use it following the syntax [#faker:<namespace>:<method>]:
{
  "id": "n:[postid]",
  "content": "[#faker:lorem:paragraphs]",
  "private": "b:[#faker:datatype:boolean]"
}
Checkout here all the methods that you can use.
For-loops
To easily create a big amount of data in an array, Restapify provides a for-loop syntax. Its structure is the following:
[
  "#for <x> in <sequence>",
  "<statement>",
  "#endfor"
]
There is 2 options to create a sequence: using an array or the range function.
For-loop's array sequence
You can easily create multiple data by iterate over an array:
[
  "#for animal in ['rabbit', 'mouse', 'lion']",
  { "type": "[animal]" },
  "#endfor"
]
Here the <sequence> is ['rabbit', 'mouse', 'lion'], the iterator variable <x> is animal and the statement is { "type": "[animal]" }. Note that you can use the value of x inside the statement by using the syntax [x]. This example will produce:
[
  { "type": "rabbit" },
  { "type": "mouse" },
  { "type": "lion" }
]
You can inject multiple pieces of data per iteration by supplying a <sequence> array containing objects with key-value pairs.
[
  "#for i in [{'t': 'snake', 'n': 'snaky'}, {'t': 'mouse', 'n': 'mousy'}]",
  {
    "type": "[i.t]",
    "name": "[i.n]"
  },
  "#endfor"
]
This example will produce:
[
  { "type": "snake", "name": "snaky" },
  { "type": "mouse", "name": "mousy" },
]
⚠️ For now only objects with a key and value from type
string | number | booleanare allowed.
For-loop's range sequence
For bigger amount of data you can use the range syntax that works the same than range() from lodash:
[
  "#for userId in range(10)",
  { "id": "n:[userId]", "type": "user" },
  "#endfor"
]
This example will produce:
[
  { "id": 0, "type": "user" },
  { "id": 1, "type": "user" },
  // ...
  { "id": 9, "type": "user" },
]
Use route's variables in sequence
You can use route's variables and route's query string variables in your for loop's sequence:
[
  "#for userId in range([q:limit|20])",
  { "id": "n:[userId]", "type": "user" },
  "#endfor"
]
You can then have x users in the response of GET /api/users?limit=x
Use faker in an array sequence
Restapify support the use of faker variables in an array sequence:
[
  "#for userName in ['[#faker:name:firstName]', '[#faker:name:firstName]', '[#faker:name:firstName]']",
  {
    "name": "[userName]",
    "website": "[#faker:internet:protocol]://[userName].[#faker:internet:domainSuffix]"
  },
  "#endfor"
]
Note that if the faker variable is a
string, you have to wrap it between'. If it's anumberor abooleanyou don't need to.
CLI
Restapify comes with a cli to easily serve your mocked API.
restapify serve
Serve the mocked API from a specific directory:
restapify serve <rootDir>
restapify list
List all the routes detected by Restapify from a specific directory:
restapify list <rootDir>
Serve from configuration file
Serve the mocked API from a configuration file. The default path is ./restapify.config.json:
restapify [path]
The configuration file has to follow the structure of the type ConfigFile:
interface ConfigFileState  {
  "route": string,
  "method": 'GET' | 'POST' | 'DELETE' | 'PUT' |'PATCH',
  "state": string
}
interface ConfigFile {
  "rootDir": string,           // [REQUIRED] relative path to the API root directory
  "publicPath": string,        // default: `api/`
  "port": number,              // default: `6767`
  "states": ConfigFileState[], // default: `undefined`
  "openDashboard": boolean     // default: `true`
}
It can be a JSON file like:
{
  "rootDir": "./api",
  "publicPath": "my-api/",
  "port": 6768,
  "states": [
    {
      "route": "/users/[userid]",
      "method": "DELETE",
      "state": "ERR"
    }
  ]
}
…but can also be a JavaScript file:
module.exports = {
  rootDir: "./api",
  publicPath: "api/",
  port: 6768
}
Flags
| short | long | description | default |
|---|---|---|---|
-v |
--version |
output the current version | |
-p <number> |
--port <number> |
port to serve the API | 6767 |
-b <string> |
--baseUrl <string> |
base url to serve the API | '/api' |
--no-open |
don't open dashboard on server start | false |
Dashboard
When you serve a Restapify mocked API, a dashboard is locally open in your default browser. It's role is to provide you an overview of the mocked API and actions to update the state of your routes.
Interface structure
The interface is compose of 3 main sections, the navbar that provide some links to the documentations and the GitHub repo, the sidebar that list all different routes detected and the body that show an overview of your route file (method, slug, status code, file content).
Update the state of a route
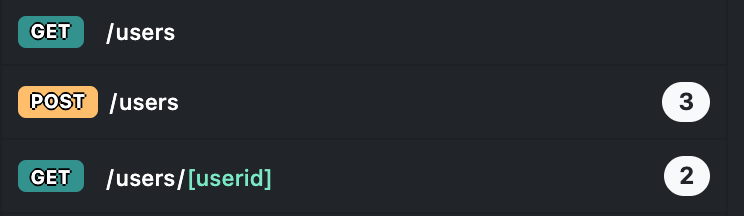
In the sidebar, you can easily see which of your routes have multiples states (see the documentation about how to define a route with several states). They are displayed with there amount of different states:
If you go to one of this route, you will see on the right a group of button:

With these you can preview (button with the eye icon) or select the state to use for this route. When you select a state, the server will serve this state for this route.
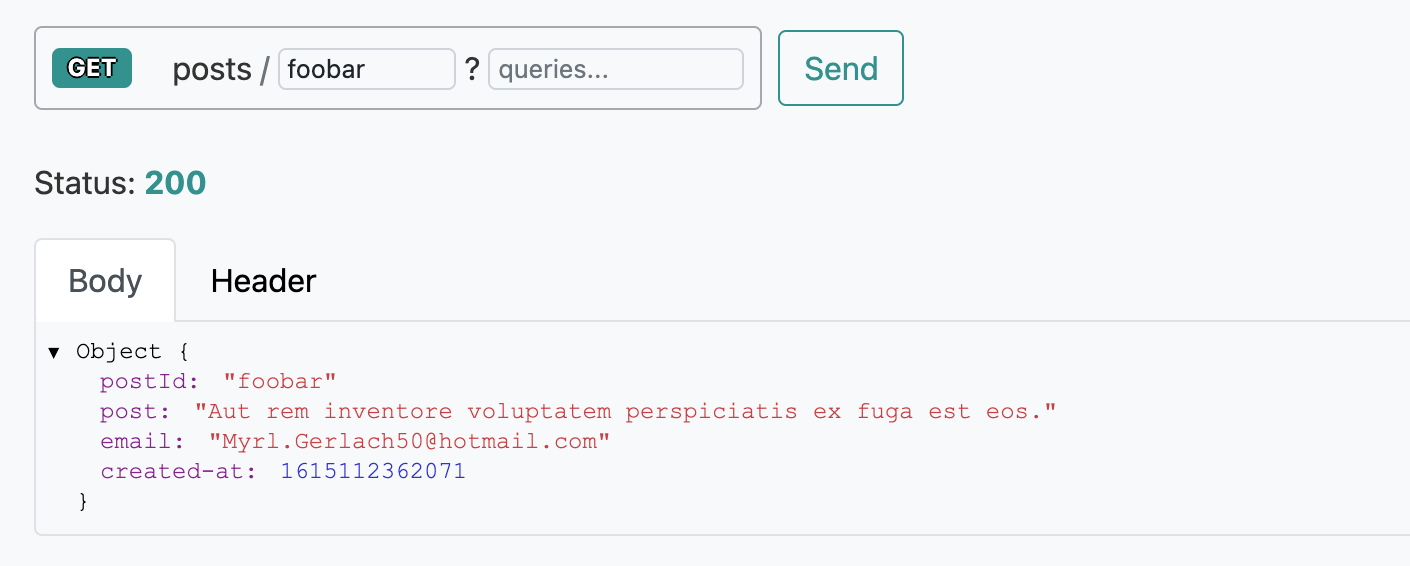
API call playground
For a better understanding of how you can create a mocked API with Restapify, you have for each route a little playground where you can call the API for this route:
JavaScript's API
Restapify provides a JavaScript API which is usable from Node.js. You will rarely need to use this, and should probably be using the command line.
Types definition list
RestapifyParams
Object of needed parameters to instanciate a Restapify's instance.
interface RestapifyParams {
  rootDir: string
  port?: number           // default: 6767
  baseUrl?: string        // default: '/api'
  states?: RouteState[]   // default: []
  openDashboard?: boolean // default: false
  hotWatch?: boolean      // default: true
}
RouteState
Used in Restapify parameter to specify which state use for a specific route.
interface RouteState {
  route: string
  state?: string
  method?: HttpVerb // default: 'GET'
}
Restapify's constructor
First step is to create an Restapify's instance with a params object from type RestapifyParams:
import Restapify from 'restapify'

const params = {...}

const rpfy = new Restapify(params)
Be aware that params.rootDir has to be the absolute path to the directory. This can be easily achieved by using the path library:
import * as path from 'path'

const rootDir = path.resolve(__dirname, './api')
const params = { rootDir }
// ...
Restapify.run()
Use the method run after the instanciation to start the mocked API server:
import Restapify from 'restapify'
const params = {...}
const rpfy = new Restapify(params)

rpfy.run()
Restapify.close()
Stop the mocked API server:
import Restapify from 'restapify'
const params = {...}
const rpfy = new Restapify(params)

rpfy.run()

setTimeout(() => {
  // Close the server after 3 seconds
  rpfy.close()
}, 3000);
Restapify.on()
You can trigger callbacks on different event with the help of the on(<event>, <callback>) method:
import Restapify from 'restapify'
const params = {...}
const rpfy = new Restapify(params)

rpfy.on('start', () => { console.log('Mocked API successfully started') })
rpfy.on(['server:start', 'server:restart'], () => { console.log('Event on server') })
rpfy.on('error', ({ error, message }) => {
  console.log(`Failed with error ${error}: ${message}`)
  rpfy.close()
  process.exit(1)
})

rpfy.run()
Events list
| event | description | callback type |
|---|---|---|
| start | Restapify started successfully | () => void |
| server:start | Mocked API served successfully | () => void |
| server:restart | Mocked has been refreshed successfully | () => void |
| dashboard:open | Dashboard SPA has been opened in the browser | () => void |
| error | Error detected | ({ error: RestapifyErrorName, message?:string } => void) |
Restapify.on('error', )
The error callback provides as parameter an object with 2 usefull infos: the error string identifier and optionally a message that explain the reason of the error. Here is the list of the different errors (type RestapifyErrorName):
| error | description | message |
|---|---|---|
| INV:JSON_FILE | one of the detected json files is invalid | ✅ |
| MISS:ROOT_DIR | root directory parameter is missing or invalid | ❌ |
| MISS:PORT | given port is not available | ❌ |
| INV:API_BASEURL | given api base url is needed for internal purposes (ex: /restapify) |
❌ |
| INV:FAKER_SYNTAX | invalid call to the fakerjs library | ✅ |
| INV:SYNTAX | invalid/unsupported syntax detected | ✅ |
| ERR | Unhandled error triggered | ✅ |
Restapify.setState(newState)
Set the state to serve for a specific route with a parameter of type RouteState:
interface RouteState {
  route: string
  state?: string
  method?: HttpVerb // default: 'GET'
}
Example:
// serve the endpoint GET /posts/[postid] with the NOT_FOUND state
rpfy.setState({
  route: '/posts/[postid]',
  state: 'NOT_FOUND'
})

// reset the endpoint to the default state
rpfy.setState({
  route: '/posts/[postid]'
})